Wednesday, February 23, 2011

Weekend Projects.

One of our first weekends in the house, we finally got to tackle a few of our projects on our To Do List.  For some reason we both woke up at a ridiculous time on Sat and Sun, so I made a lot of coffee and perused my favorite design blogs until Lowe's opened. 

We knew we badly needed a rake and an outdoor broom, and some wood for the cabinet underneath the kitchen sink.  David took measurements and I sipped more coffee before heading off to the store.  It's so convenient having a Lowe's a 1/2 mile from our house.  We had the plywood cut down to size at the store {so it would fit into my car} and picked up the rake and broom and headed back.  It was only 930 am when we actually started working on the backyard.  I cannot remember the last time I had started any project on the weekend before noon.  David cut and installed the wood in the cabinet and I got to work on our brick patio area.  Below are some before and after pictures:
Before. Backyard Brick Patio area that might not have been raked for about 3 years. 
After! You can actually see the edge of the patio.  {I still have blisters on my fingers from the handles of the rake and broom, I should have bought some gardening gloves}
Before.  The cabinet under the kitchen sink is missing a bottom, so everything just sat on the floor.  It was really gross and scary.
After!  David installed the board and I painted the entire cabinet white for that oh-so-wonderful fresh feeling.  So happy that we will finally be able to use our only bottom cabinet {free from worry of grossness and disease}.

Friday evening was spent with a few new, and very different, friends:
I headed to Lowe's {my fifth trip} to get a few things that I needed in order to start on my bathroom makeover.  I already had paintable wall spackle and had filled all of the many holes in the walls. The tools I needed for this To Do list are:
  • Paint Samples
  • An edge paintbrush
  • A wide spackle brush {a barrier to keep my paint brush and paint away from the floor}
  • A block sander
  • and....PAINTABLE CAULK! {Warning: This stuff is highly addictive, users beware.  I soon found myself walking around the house with the caulk gun looking for even the slightest crack to use this amazing creation on}
I assume this was the hole for the original light {not that the current one is much of an improvement} and it was spackled terribly.  I filled it in some more and still need to sand it but this is a vast improvement on how it was. 
My first attempt at using the caulk gun {I should have taken a before picture but was far too excited to use the darn thing}.   If you had seen the before picture, you would have seen a large crack between the toilet paper holder and the wall.  I then proceeded to fill in the baseboard crack below, along with the cabinets in the kitchen.   There is still a lot of cracks to fill and a lot of caulk left.  I am beyond excited for this.

Our first attempts at some weekend projects were spectacular!  We got some needed things done and still have plenty more projects to accomplish.  Hopefully, we will have a long weekend of painting in the near future {once our colors are approved}.

Sunday, February 20, 2011

Living Room Mood Board

Below is my first attempt at a Mood Board.  It is a way of displaying my ideas for a room.  I'm not exceptionally thrilled with the first one, but it works.  I am sure I will get better at them as I do more and more of them. 

My first Mood Board is for the Living Room.  As we don't have an unlimited budget, I plan on using most of the things we already have along with some thrifted items and (fingers crossed) an amazing inspiration rug.


ONE:  Our living room color at the moment is a horrendous camel color (it wouldn't be that bad if it was even or not glopped onto the baseboards).  I love this color because it is a shade of gray but still feels warm (which is what we like about the current color).

TWO: Our IKEA Bookcase.  One of the first things we bought once we moved, I love this thing.  So perfect for displaying the things and books we love.  It was originally used as an entryway console, it has now been re-purposed as our entertainment center.  Still needs to be tweaked design-wise, but we'll get there eventually.

THREE: The Slipper Chair.  I believe I have been drooling over this thing for about two years.  They have one at Urban Outfitters for about $329, but after some design blog digging I happened upon CSN Stores.  They have this exact chair for about $100 cheaper!  It's still a little pricey, however I MUST HAVE IT.  If not this one than its smokey cousin.  CSN has great home goods for great prices.  I will be checking them out for some great things down the road.

FOUR: The IKEA Basket.  I have been thinking about these baskets for about a year (probably since we purchased the bookcase).  I finally broke down and bought four of them yesterday!  I love the added texture to the bookcase and it hides David's XBOX controllers and my everyday purses.

FIVE: Our Sofa and Loveseat.  When we moved my aunt and uncle were buying new furniture and gave us their old ones.  They were in great shape and so comfortable.  We love them and definitely lucked out.  I have been pricing out new ones (they are a little to big for our house), but I think we can keep them a little longer and make them work.

SIX: The Inspiration RugI cannot remember where I first saw this rug (Apartment Therapy maybe?) but I HAD TO HAVE IT! It is made up of FLOR tiles and at only $13.99/sq ft it is totally affordable!  I will paint first and then I will finally order it!  I think it will look great in the chevron pattern shown above.  This is my new favorite pattern. I need to find some thrifted dining chairs to upholster the cushions with this pattern. 
 
I also plan on making some new throw pillows for the couches, adding pretty white ceramic accessories, and of course some DIY art for the walls.

Well, I am off to the Habitat for Humanity ReStore to find some great old wood for a mirror or to use as a headboard, or light fixtures that need a bit of love.  I also need to do a little thrifting around Tampa and will share (if I find any...I don't always have the best of luck with these places) of my great finds.

Tuesday, February 15, 2011

Blank Canvas.

Right before we started moving all of our stuff in, I wanted to sneak in and take some before before pictures.  A true blank canvas.

 This is the view looking back at the front door.  This is our living room.  It doesn't exactly fit both of our large couches so I plan on putting the small sofa in Davids office and perhaps getting two patterned slipper chairs to make up for the loss of seating.  We also need a rug.  I would absolutely love to get a rug made of FLOR tiles.
View of the living room looking in from the front door.  On the left is both bedrooms and the 1.5 baths. 
 The Kitchen (looking in from the living room).  It is a great size for us and will a few upgrades and clever decorating I believe it will be just perfect.  I plan on sprucing up the hardware on the cabinets, adding some sort of kitchen cart, and perhaps turn the end cabinet into a wine rack.  Also, red is not my favortie color and once I find an inexpensive way to cover up those red backsplash tiles (if this wasn't a rental I would rip them out and try my hand at tiling) the tiles will be gone.
 The Dining Room (from the kitchen).  It fits our table and doesn't need too much work, just a coat of paint and a new light and I'll be happy as a clam.  Through that doorway is David's office.
 Master Bedroom (looking in from the closet area).  Big enough to fit all of our furniture in the same layout that we had in the apt (so we don't have to learn where the corners of the bed are with our shins late at night).  It's very clean and just needs a coat of paint and maybe a new light fixture.
 Master bathroom.  The image above is larger than it may appear.  Wait. No it isn't.  You can literally sit on the toilet and brush your teeth at the same time.  Which is all that needs to happen in there so it seems that it works out perfectly.
 The Full bathroom.  What is not pictured is the lovely under-the-sea tile scheme in the shower.  It is not  as terrible as it sounds as long as the shower curtain is closed. 
 Guest bedroom.  We will finally have one of these!  We can invite people up and offer them a place to sleep (I will try to make sure it won't be on the twin daybed).  Although it may be occupied for the next few months! Pictured below is the guest closet.

 Laundry Room/Pantry.  Pretty self-explanatory.
The Infamous TreeHouse.  David is so excited about his treehouse.  I think he's shown everyone the picture.  He plans on setting up some sort of "office" up there.  But everytime he talks about his treehouse I hear "nudey magazine day." Weird. We plan on getting an outdoor dining table and building a fire pit in the great big fenced in yard.

The only room I forgot to photograph was David's office.  He gets the big room off of the dining room.  It has hardwood floors so he can make all the mess his heart desires.  The previous tenants had their living room in there but I don't believe our couches would have fit through the door.  This is my blatant attempt to lure him home (also with the promise of food).

We have a lot of work ahead of us and I am so looking forward to putting our very own touch on our own "rental" home.  Now I must find a name for this little house.

Stay tuned for posts on my ideas for each room.

Tuesday, February 8, 2011

...and we're IN!

6 Full car loads.
130 miles on my car.
1 U-Haul truck.
4 Extra Helpers.
1000 Trips up and down a flight of stairs...
And we're finally all moved into our house!

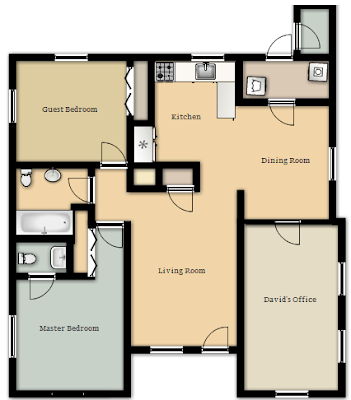
Below is the layout of our house that I did on Floorplanner.com.
David may be the architect in the family but someone else may have some skills...

Before pictures of the inside to come with many more projects on the way!

Related Posts Plugin for WordPress, Blogger...