Well, in all honesty, I said 'OF COURSE!' but whose really counting...

Friday, July 8, 2011
Tuesday, May 10, 2011
Keeping it Cool
There were a few things in the house that needed updating. Mind you, we are renting and do not have a bottomless account to fund out projects but we make do.
Thinking only of the environment of course and not about the boatloads of cash we could save {obviously}, I thought it was definitely a MUST to replace the old outdated thermostat.
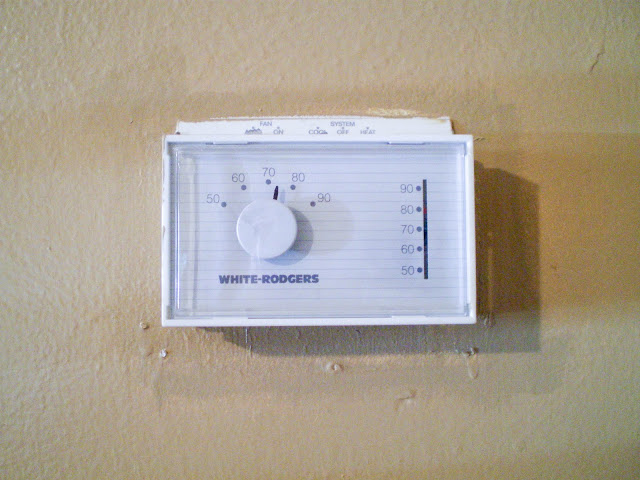
Here is the money-sucker-mother-earth-killer thermostat that came with the house:

Since this was my idea of a good time on a Saturday night, David left this all up to me {just not when it came down to actually doing anything that involved electric, that's where David took over}. We turned off the electric at the breaker that controlled the AC unit {read: G-G-G Unit} and David tested it with his electric-tester-with-a-light-bulb thingy. And yes that is its technical term and please don't ask me where you can get one {ask a guy at Lowe's}.

I read up on the instructions earlier so I could supervise the entire project. I told David to undo all the wire and label them with the little stickers that came with the new unit so we could easily reattach them. You can see them in the picture below.

He took out the two screws that held it in place {I could've done that but relinquished all tools over to the man}, being very careful of the Mercury.

David reattached the screws and then hooked up all the little wires to the corresponding little screws.


It's so pretty and I love that I am the only one who knows how to work it {muahahaha}. For only $30 at Lowe's, I am sure this guy is going to save us at least double that. Sometimes it pays to be good to Mother Earth.
David your welcome too.
Sunday, April 17, 2011
Suck and Blow
David doesn't get to help me very much while he's in school due to the large amount of projects he has with this program {he logged 112 hours a few weeks ago. eeek}. But during his spring break we logged some hours at home doing yard work.
I do believe the previous tenants never picked up a rake in the few years that they lived here and we have some rather large trees in both the front and back yard {read: 3 inch thick layer of leaves}. So we stared raking. And raking. And raking. We were a few hours into it when David thought we needed another power tool.

We headed to Lowe's and picked up a leaf blower. He picked out an electric one {so we don't have to worry about gas cans} and headed home to start playing with the new toy. It's a combo leaf blower/mulcher {it sucks and blows hence the witty title of this post} and came with some assembly required. The numerous amounts of parts were a little confusing so after tried his hand at putting it together by himself, I gently handed him the instructions...


He even let me in on the fun...

It wasn't terribly heavy but it was hard to blow the leaves where I wanted them. David changed the parts and turned it into the mulcher {my favorite part!}. I have a strange love for sweeping, mopping and vacuuming and since this is somewhat an extension of that, it was my turn to go town. This thing sucked up the leaves and chops them up into itty-bitty pieces. Awesome!

We are even seeing some results of our hard work already. Where there used to be a lot of dirt under those 3 inches of leaves, there are now some green sprouts. We bought some grass seed as well and threw that out the other day but we shall see how that goes.
Happy Spring!
Saturday, April 16, 2011
Dust off the Apron
With Easter being a week away, I think it might be time to don on the apron and roast another turkey. The last attempt went so well {sans leaving the giblets inside while it cooked....oops. I swear I looked for them, who knew they were in the neck?} I am excited for another go. I understand that ham is the more traditional route, but I prefer the bird {it goes better with mashed potatos and gray}.

David has another huge project due the Monday after, so it may be just Jocelyn and myself, but that means more leftovers for turkey and gravy sandwiches. Yum.
Thursday, April 14, 2011
Things Look Different.
This feels better. There was something that just wasn't sitting with me with the last layout. It was just...there. Not very personal. I found it on a great blog template website and thought it was for me, but I could never settle into it. This is better. More my taste. I even designed the header all by myself {with a little push from David}. Take a look around and let me know what you think! There may be a few more changes coming soon...
Monday, March 21, 2011
Paint, Paint, Painting Avay
Sung to the tune of 'Roll-roll-roll in ze hay' {Young Frankstein, LOVE that movie}
One of the more massive undertakings over here at the casa, has been painting. When we moved I knew one of the first things that needed to be done were the walls. Some were painted back to white {which made the place feel cleaner} and some were left alone {with terrible, horrific, god-awful paint jobs}. The living room and David's office were so uneven, it was laughable. And the bathroom was a light powdery blue {yum...}. I, all by my lonesome, painted the living room on a gorgeous Saturday. Everything from the trim work to the 9 ft walls and the edging around the ceiling. It took 8 hours, but I finished and even managed to muster up enough energy to go out to dinner and play a rousing game of Balderdash {side note: Best Game of LIFE and I am still currently undefeated, any takers?}.


One of the more massive undertakings over here at the casa, has been painting. When we moved I knew one of the first things that needed to be done were the walls. Some were painted back to white {which made the place feel cleaner} and some were left alone {with terrible, horrific, god-awful paint jobs}. The living room and David's office were so uneven, it was laughable. And the bathroom was a light powdery blue {yum...}. I, all by my lonesome, painted the living room on a gorgeous Saturday. Everything from the trim work to the 9 ft walls and the edging around the ceiling. It took 8 hours, but I finished and even managed to muster up enough energy to go out to dinner and play a rousing game of Balderdash {side note: Best Game of LIFE and I am still currently undefeated, any takers?}.
Here are the tools I used:

3 Gallons of Paint {trim, living room, and the bathroom}
Rollers
Frog tape
Paint tray liner
Edge pads {for the ceiling}
A small roller {detail work}
And stir sticks
{Not pictured above: a marvelous angled Edger Brush, didn't even have to use the Frog tape}
I turned on some Katy Perry and went to town, turning an embarrassing ugly, uneven camel colored living room into a warm and cozy living room.

The color wasn't terrible but so uneven.

You can kinda see it in this picture. David and Jocelyn can vouch for how bad it was.

One coat of paint and it was instantly better! So much easier than when we painted the apartment {the walls are smooth here and the apt had texture like you wouldn't believe}.

I love that it acts as a neutral and looks great with the floor and our existing furniture.
{please don't try to guess what's on our television, I tend to watch terrible t.v.}
I finished both bathrooms during a few nights after work, again by myself. I am so happy its done as it looks loads better.

Its so hard to get a good picture of our bathrooms. But it's more brown and a little lighter than the living room. These pictures make it look like their the same color.

I even painted the cabinet {it definitely needed it}
I couldn't get any pictures at the master {ha. that's funny} bathroom, as there is a mattress in the way. More to come on that project and a few others later this week.
Thursday, March 17, 2011
Three years and counting...

First Anniversary

Second Anniversary

Third Anniversary
After three years I think that I really like him...a lot.
This past week has been great! He has been on spring break and has been such a great help around the house! We have been working on lots of projects and I have plenty of pictures to share {when I get a chance to sit down and upload all of them}...
Thursday, March 3, 2011
Some Successful Thrifting!
For once I had some luck on my Thrifting Trip! I had set out in search of dining chairs (which we have needed for over a year now and I am currently foaming-at-the-mouth to redo a set that may need some love), old reclaimed wood to use on a long mirror in our guestroom, and just some knick knacks that I could use on our shelf. While I was unsuccessful in the major things I was looking for, I scored some awesome accessories!
My first stop was a GoodWill located in N Tampa. I walked straight back to the home decor section, not really sure what I was looking for, but looking nonetheless. There were so many things! New and Old. A lot of things were still wrapped in its original packaging! I will have to make bi-weekly trips to see if any new things pop up. I had a few too many things in my hands so I had to put some back as to not go overboard and buy things that I could not think of a place for.


My first stop was a GoodWill located in N Tampa. I walked straight back to the home decor section, not really sure what I was looking for, but looking nonetheless. There were so many things! New and Old. A lot of things were still wrapped in its original packaging! I will have to make bi-weekly trips to see if any new things pop up. I had a few too many things in my hands so I had to put some back as to not go overboard and buy things that I could not think of a place for.

Multiple sets of frames are usually hard to come by at GoodWill but there were about 10 of these frames on the shelf (I thought three would suffice). The frames were originally $3 each but I was happy to hear they were half off that day. SCORE! I haven't decided what color to spray paint them yet (white, black, maybe a beautiful cobalt blue?) but will decide after I paint this weekend!

I love Baroque type frames. I think they are so elegant and eclectic and add interest to any wall. I think this would look great spray painted white and for only $4 for a large frame, that's another win for me!

Another thing I have been working on for about a year is our dining room table-scape. I think I have found the perfect inspiration photo and it involves candlesticks, hurricane glass, moss, and a few succulents. I picked up these babies for about $1 each on my way to the register. (Spray paint again will be involved)

This antique tray was buried on a bottom shelf. It would be perfect sitting atop a pile of books with a candle or some coral. I haven't decided if I will leave it the way it is or try to clean it. It is a little cruddy so perhaps I will clean it enough to look new but still look old at the same time. At only $2, my heart fluttered.
There was a single chair that I eyed for a good 5 minutes before deciding it would be too hard to save. It was $8 and had good lines, but the large crack in the seat (which looked like it had previously tried to be hot glued together) that looked beyond repair (at least what I thought I could do).
GoodWill was a great stop and spending only $14 made it all so much better.
I attempted to go to ReStore and a few other thrift stores to no avail. ReStore is run by Habitat for Humanity and collects donated salvage building materials to sell in ReStore in order to raise funds for its organization. This was in a not-so-nice part of town and looked closed (I was not getting out of my car to check).
I had a coupon for Michaels (never ever go there without printing off a coupon! Seriously 40-50% off coupons make me giddy). I shot over there looking for their amazing glass apothecaries. I would love a collection of these for my kitchen or dining room. I couldn't pull the trigger yet so I headed next door to Marshall's. They always have a random assortment of home accessories that are fun to pick through. I have seen a lot of glass cloches in my fave design blogs lately and when I saw this on the shelf...I HAD TO HAVE IT!

Love the soft bell shape and paired with a tray or even just set over Owl-bert, its a simple clean statement. Again that cost got me swooning as well. $8 makes me love shopping for a deal. Adding items that make me happy (I think David likes my purchases as well) makes the space feel oh-so-special and very personal.
You don't have to buy everything new when trying to set the tone in a new space. You just have to find pieces that you love and have a eye for the things that you can change to make them perfect for you.
Wednesday, February 23, 2011
Weekend Projects.
One of our first weekends in the house, we finally got to tackle a few of our projects on our To Do List. For some reason we both woke up at a ridiculous time on Sat and Sun, so I made a lot of coffee and perused my favorite design blogs until Lowe's opened.
We knew we badly needed a rake and an outdoor broom, and some wood for the cabinet underneath the kitchen sink. David took measurements and I sipped more coffee before heading off to the store. It's so convenient having a Lowe's a 1/2 mile from our house. We had the plywood cut down to size at the store {so it would fit into my car} and picked up the rake and broom and headed back. It was only 930 am when we actually started working on the backyard. I cannot remember the last time I had started any project on the weekend before noon. David cut and installed the wood in the cabinet and I got to work on our brick patio area. Below are some before and after pictures:

Before. Backyard Brick Patio area that might not have been raked for about 3 years.

After! You can actually see the edge of the patio. {I still have blisters on my fingers from the handles of the rake and broom, I should have bought some gardening gloves}

Before. The cabinet under the kitchen sink is missing a bottom, so everything just sat on the floor. It was really gross and scary.

After! David installed the board and I painted the entire cabinet white for that oh-so-wonderful fresh feeling. So happy that we will finally be able to use our only bottom cabinet {free from worry of grossness and disease}.
Friday evening was spent with a few new, and very different, friends:

I headed to Lowe's {my fifth trip} to get a few things that I needed in order to start on my bathroom makeover. I already had paintable wall spackle and had filled all of the many holes in the walls. The tools I needed for this To Do list are:
- Paint Samples
- An edge paintbrush
- A wide spackle brush {a barrier to keep my paint brush and paint away from the floor}
- A block sander
- and....PAINTABLE CAULK! {Warning: This stuff is highly addictive, users beware. I soon found myself walking around the house with the caulk gun looking for even the slightest crack to use this amazing creation on}

I assume this was the hole for the original light {not that the current one is much of an improvement} and it was spackled terribly. I filled it in some more and still need to sand it but this is a vast improvement on how it was.

My first attempt at using the caulk gun {I should have taken a before picture but was far too excited to use the darn thing}. If you had seen the before picture, you would have seen a large crack between the toilet paper holder and the wall. I then proceeded to fill in the baseboard crack below, along with the cabinets in the kitchen. There is still a lot of cracks to fill and a lot of caulk left. I am beyond excited for this.
Our first attempts at some weekend projects were spectacular! We got some needed things done and still have plenty more projects to accomplish. Hopefully, we will have a long weekend of painting in the near future {once our colors are approved}.
Our first attempts at some weekend projects were spectacular! We got some needed things done and still have plenty more projects to accomplish. Hopefully, we will have a long weekend of painting in the near future {once our colors are approved}.

Sunday, February 20, 2011
Living Room Mood Board
Below is my first attempt at a Mood Board. It is a way of displaying my ideas for a room. I'm not exceptionally thrilled with the first one, but it works. I am sure I will get better at them as I do more and more of them.
My first Mood Board is for the Living Room. As we don't have an unlimited budget, I plan on using most of the things we already have along with some thrifted items and (fingers crossed) an amazing inspiration rug.

TWO: Our IKEA Bookcase. One of the first things we bought once we moved, I love this thing. So perfect for displaying the things and books we love. It was originally used as an entryway console, it has now been re-purposed as our entertainment center. Still needs to be tweaked design-wise, but we'll get there eventually.
THREE: The Slipper Chair. I believe I have been drooling over this thing for about two years. They have one at Urban Outfitters for about $329, but after some design blog digging I happened upon CSN Stores. They have this exact chair for about $100 cheaper! It's still a little pricey, however I MUST HAVE IT. If not this one than its smokey cousin. CSN has great home goods for great prices. I will be checking them out for some great things down the road.
FOUR: The IKEA Basket. I have been thinking about these baskets for about a year (probably since we purchased the bookcase). I finally broke down and bought four of them yesterday! I love the added texture to the bookcase and it hides David's XBOX controllers and my everyday purses.
FIVE: Our Sofa and Loveseat. When we moved my aunt and uncle were buying new furniture and gave us their old ones. They were in great shape and so comfortable. We love them and definitely lucked out. I have been pricing out new ones (they are a little to big for our house), but I think we can keep them a little longer and make them work.
SIX: The Inspiration Rug. I cannot remember where I first saw this rug (Apartment Therapy maybe?) but I HAD TO HAVE IT! It is made up of FLOR tiles and at only $13.99/sq ft it is totally affordable! I will paint first and then I will finally order it! I think it will look great in the chevron pattern shown above. This is my new favorite pattern. I need to find some thrifted dining chairs to upholster the cushions with this pattern.
I also plan on making some new throw pillows for the couches, adding pretty white ceramic accessories, and of course some DIY art for the walls.
Well, I am off to the Habitat for Humanity ReStore to find some great old wood for a mirror or to use as a headboard, or light fixtures that need a bit of love. I also need to do a little thrifting around Tampa and will share (if I find any...I don't always have the best of luck with these places) of my great finds.
My first Mood Board is for the Living Room. As we don't have an unlimited budget, I plan on using most of the things we already have along with some thrifted items and (fingers crossed) an amazing inspiration rug.

ONE: Our living room color at the moment is a horrendous camel color (it wouldn't be that bad if it was even or not glopped onto the baseboards). I love this color because it is a shade of gray but still feels warm (which is what we like about the current color).
TWO: Our IKEA Bookcase. One of the first things we bought once we moved, I love this thing. So perfect for displaying the things and books we love. It was originally used as an entryway console, it has now been re-purposed as our entertainment center. Still needs to be tweaked design-wise, but we'll get there eventually.
THREE: The Slipper Chair. I believe I have been drooling over this thing for about two years. They have one at Urban Outfitters for about $329, but after some design blog digging I happened upon CSN Stores. They have this exact chair for about $100 cheaper! It's still a little pricey, however I MUST HAVE IT. If not this one than its smokey cousin. CSN has great home goods for great prices. I will be checking them out for some great things down the road.
FOUR: The IKEA Basket. I have been thinking about these baskets for about a year (probably since we purchased the bookcase). I finally broke down and bought four of them yesterday! I love the added texture to the bookcase and it hides David's XBOX controllers and my everyday purses.
FIVE: Our Sofa and Loveseat. When we moved my aunt and uncle were buying new furniture and gave us their old ones. They were in great shape and so comfortable. We love them and definitely lucked out. I have been pricing out new ones (they are a little to big for our house), but I think we can keep them a little longer and make them work.
SIX: The Inspiration Rug. I cannot remember where I first saw this rug (Apartment Therapy maybe?) but I HAD TO HAVE IT! It is made up of FLOR tiles and at only $13.99/sq ft it is totally affordable! I will paint first and then I will finally order it! I think it will look great in the chevron pattern shown above. This is my new favorite pattern. I need to find some thrifted dining chairs to upholster the cushions with this pattern.
I also plan on making some new throw pillows for the couches, adding pretty white ceramic accessories, and of course some DIY art for the walls.
Well, I am off to the Habitat for Humanity ReStore to find some great old wood for a mirror or to use as a headboard, or light fixtures that need a bit of love. I also need to do a little thrifting around Tampa and will share (if I find any...I don't always have the best of luck with these places) of my great finds.
Tuesday, February 15, 2011
Blank Canvas.
Right before we started moving all of our stuff in, I wanted to sneak in and take some before before pictures. A true blank canvas.


View of the living room looking in from the front door. On the left is both bedrooms and the 1.5 baths.


The only room I forgot to photograph was David's office. He gets the big room off of the dining room. It has hardwood floors so he can make all the mess his heart desires. The previous tenants had their living room in there but I don't believe our couches would have fit through the door. This is my blatant attempt to lure him home (also with the promise of food).
We have a lot of work ahead of us and I am so looking forward to putting our very own touch on our own "rental" home. Now I must find a name for this little house.
Stay tuned for posts on my ideas for each room.
Subscribe to:
Posts (Atom)